 Before
 After with new granite steps
We honestly didn't have to do much to get the steps installed( we paid the granite company to do that), but the prep work was pretty intense. We had to demo the old brick steps, which was the easy part, then with a sledge hammer, remove the concrete beneath it. Then we had to level and compact the ground so it could handle the weight of the granite. We also had to get rid of all the old bricks and concrete. That turned into quite the event when the only place we found that would take the materials was a gravel pit - we paid a guy in an excavator
 to scrape the rubble out of the u-haul trailer( hell yes we paid the $8.95 or whatever it is for insurance!) which was super scary - I dont think I could ever accurately describe what this experience was like!! You really don't know the strength of one of those things until you are in a car being pulled back by one of them as it scrapes bricks from your trailer! Maybe we were taking a risk by doing this - but after spending hours loading that thing up, we just didn't have the strength to unload it ourselves and luckily for us, we made a good choice - the guy didn't even dent the u-haul trailer! It was seriously crazy.
Ok so on with the improvements. You can see from the pictures of the new steps that our door is "a contractor special" straight from Lowes or Home Depot. This door isn't all that bad, but it really didn't fit our old house and because the do it yourselfer before us took all the short cuts he could, it leaked and let tons of cold air in during the winter. The water leaks were damaging the floor of our mudroom and we decided we couldn't go another winter with the door like this.
My Dad's friend, Steve, works construction and at a demo job he removed a wonderful old stained glass door that he saved for us. It has been sitting in our mudroom, waiting to be installed for about a year now and we finally got to it this weekend. This wasn't a straight forward install - because the door wasn't prehung we had to hang it ourselves, make sure it was weather tight and of course, make sure it looked professional. We had to cut the opening for the door 6 inches wider and because of this had to remove much of the vinyl siding. We have put up some primed thin plywood for siding( we are still finishing this part) as a temporary fix - we plan to take all the vinyl siding off our house next summer and restore and replace the clapboards underneath, but the mudroom was an addition to our house and it does not have the clapboards like the rest of the house. Unless we removed all the siding, we wouldn't be able to match the new clapboards up to the old ones and this would make the house look very funny once we removed the vinyl siding on the main part of the house. So maybe it doesn't look the best that it could, but we have to take baby steps towards the end result and sometimes that is going to mean temporary fixes. Ok, so on with the pictures...
Here are the pictures after day one of the install:


And here is the picture of the nearly finished project after day 2:
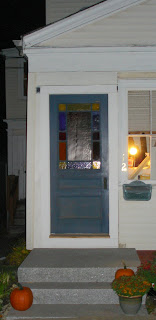 You can still see some of the black ice and water shield behind our makeshift siding and trim, but we will be covering that today. Regardless, it completely changes the look of our house - it really restores that "old house feeling." More pictures to come as we finish the project up!
to scrape the rubble out of the u-haul trailer( hell yes we paid the $8.95 or whatever it is for insurance!) which was super scary - I dont think I could ever accurately describe what this experience was like!! You really don't know the strength of one of those things until you are in a car being pulled back by one of them as it scrapes bricks from your trailer! Maybe we were taking a risk by doing this - but after spending hours loading that thing up, we just didn't have the strength to unload it ourselves and luckily for us, we made a good choice - the guy didn't even dent the u-haul trailer! It was seriously crazy.Ok so on with the improvements. You can see from the pictures of the new steps that our door is "a contractor special" straight from Lowes or Home Depot. This door isn't all that bad, but it really didn't fit our old house and because the do it yourselfer before us took all the short cuts he could, it leaked and let tons of cold air in during the winter. The water leaks were damaging the floor of our mudroom and we decided we couldn't go another winter with the door like this.
My Dad's friend, Steve, works construction and at a demo job he removed a wonderful old stained glass door that he saved for us. It has been sitting in our mudroom, waiting to be installed for about a year now and we finally got to it this weekend. This wasn't a straight forward install - because the door wasn't prehung we had to hang it ourselves, make sure it was weather tight and of course, make sure it looked professional. We had to cut the opening for the door 6 inches wider and because of this had to remove much of the vinyl siding. We have put up some primed thin plywood for siding( we are still finishing this part) as a temporary fix - we plan to take all the vinyl siding off our house next summer and restore and replace the clapboards underneath, but the mudroom was an addition to our house and it does not have the clapboards like the rest of the house. Unless we removed all the siding, we wouldn't be able to match the new clapboards up to the old ones and this would make the house look very funny once we removed the vinyl siding on the main part of the house. So maybe it doesn't look the best that it could, but we have to take baby steps towards the end result and sometimes that is going to mean temporary fixes. Ok, so on with the pictures...
Here are the pictures after day one of the install:


And here is the picture of the nearly finished project after day 2:
 You can still see some of the black ice and water shield behind our makeshift siding and trim, but we will be covering that today. Regardless, it completely changes the look of our house - it really restores that "old house feeling." More pictures to come as we finish the project up!


No comments:
Post a Comment